一、为什么要学习React Native§
与其说是学习React Native,不如说是深入这一类框架的本源,React Native有着优秀的设计思想,海量的开发者和应用,经过多年的工程领域验证,在一定程度上已经离不开React Native这种开发方案。
1.跨平台发展§
基于WebView实现的跨平台§
基于JS与WebView实现,最早出现的跨平台框架,代表作为:PhoneGap、PWA小程序。第三方应用程序创建 HTML 并将其显示在平台上的 WebView 中,对于操作系统提供的一些服务和API,通过JS Bridge来调用。然而,一个完整HTML5页面的展示要经历浏览器控件的加载、解析和渲染三大过程,性能消耗要比原生开发增加N个数量级,所以这种方案的瓶颈在于WebView对H5页面的渲染。

以React Native为代表的一类跨平台§
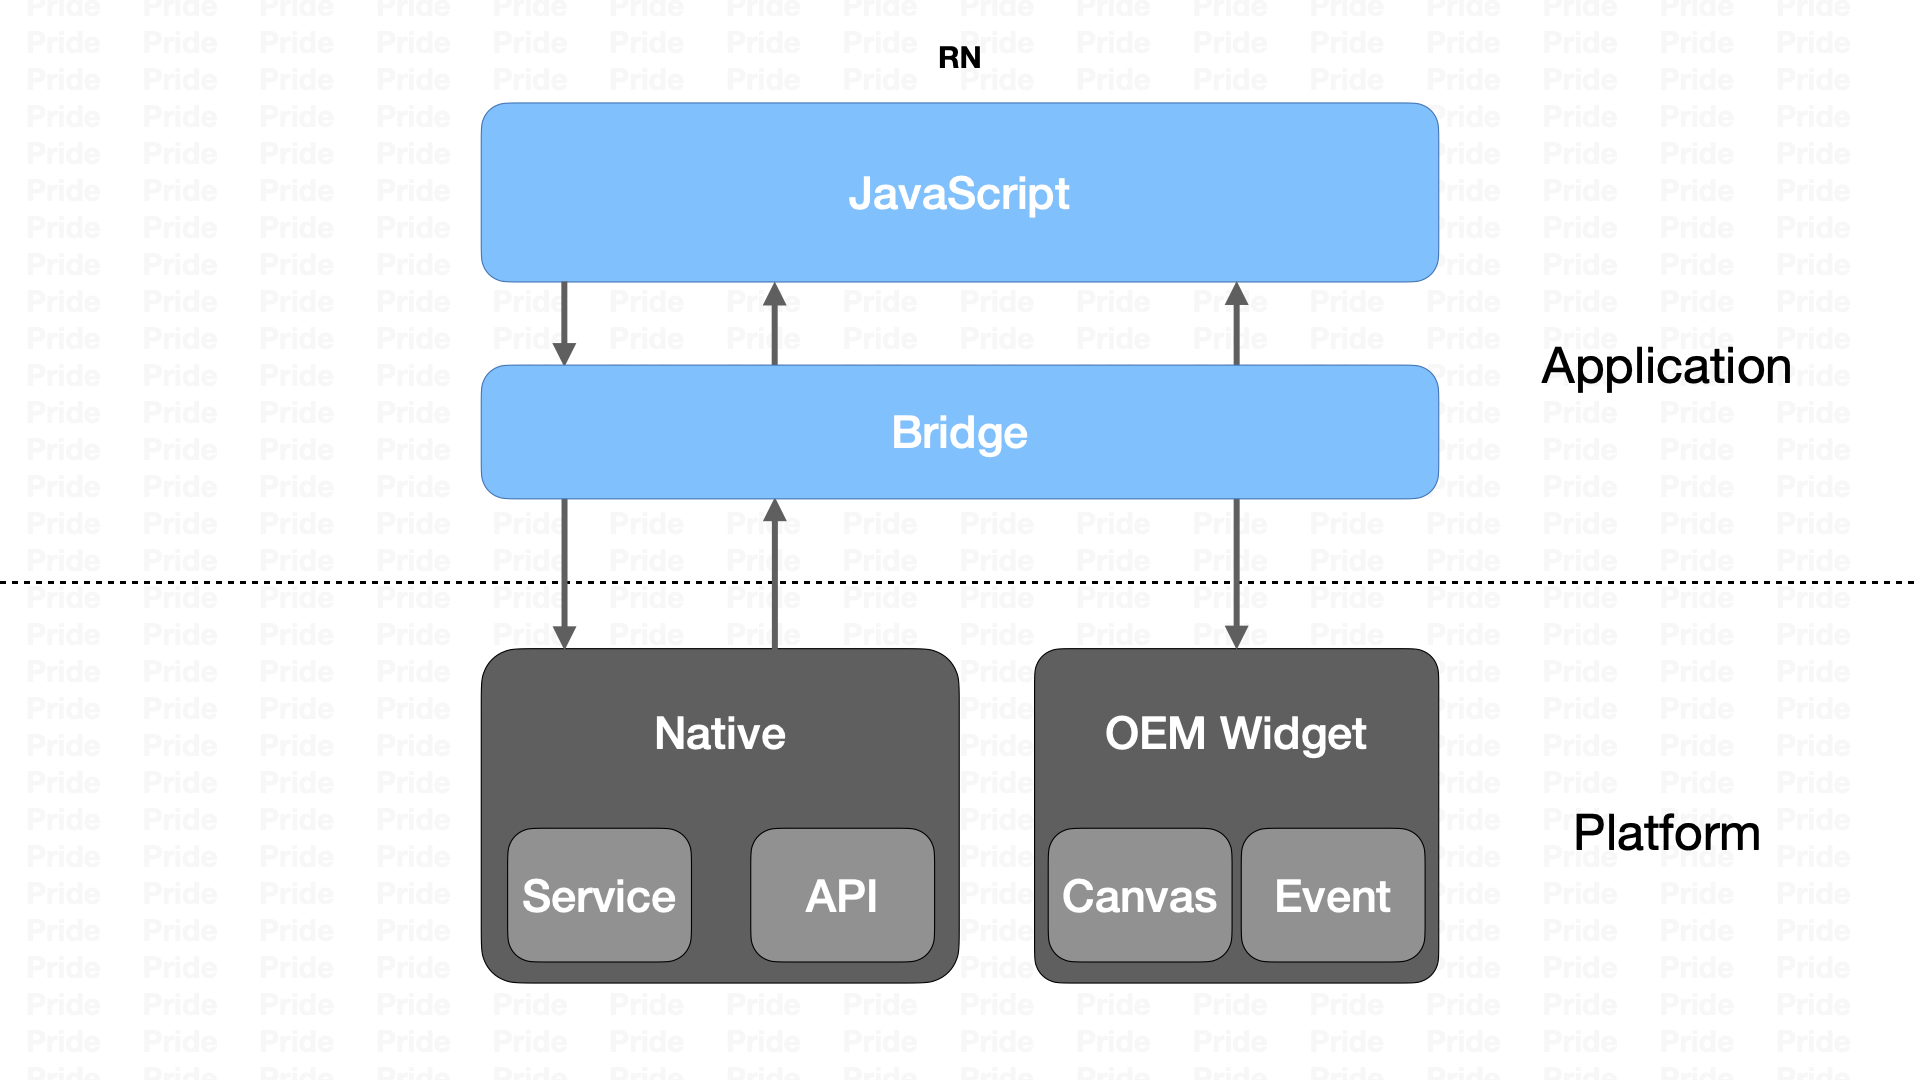
这类方案也就衍生出了「泛前端」这个概念,也是我在滴滴听到的最多的一个分类,这类方案有React Native、Weex还有我司的Hummer,放弃了使用Webview渲染的模式,采用定制原生UI组件的方式来替代核心的渲染引擎,性能上要比前者好很多,同时又使用了 JavaScript/TypeScript 作为开发语言,拥有更丰富的生态,对于前端开发人员以及客户端开发人员,入门门槛做了一个折中处理;但是与Native的交互都要通过Bridge来实现,而Bridge又是一个异步方案,自此Bridge也就成为了一个性能上的瓶颈。
以Flutter为代表的跨平台§
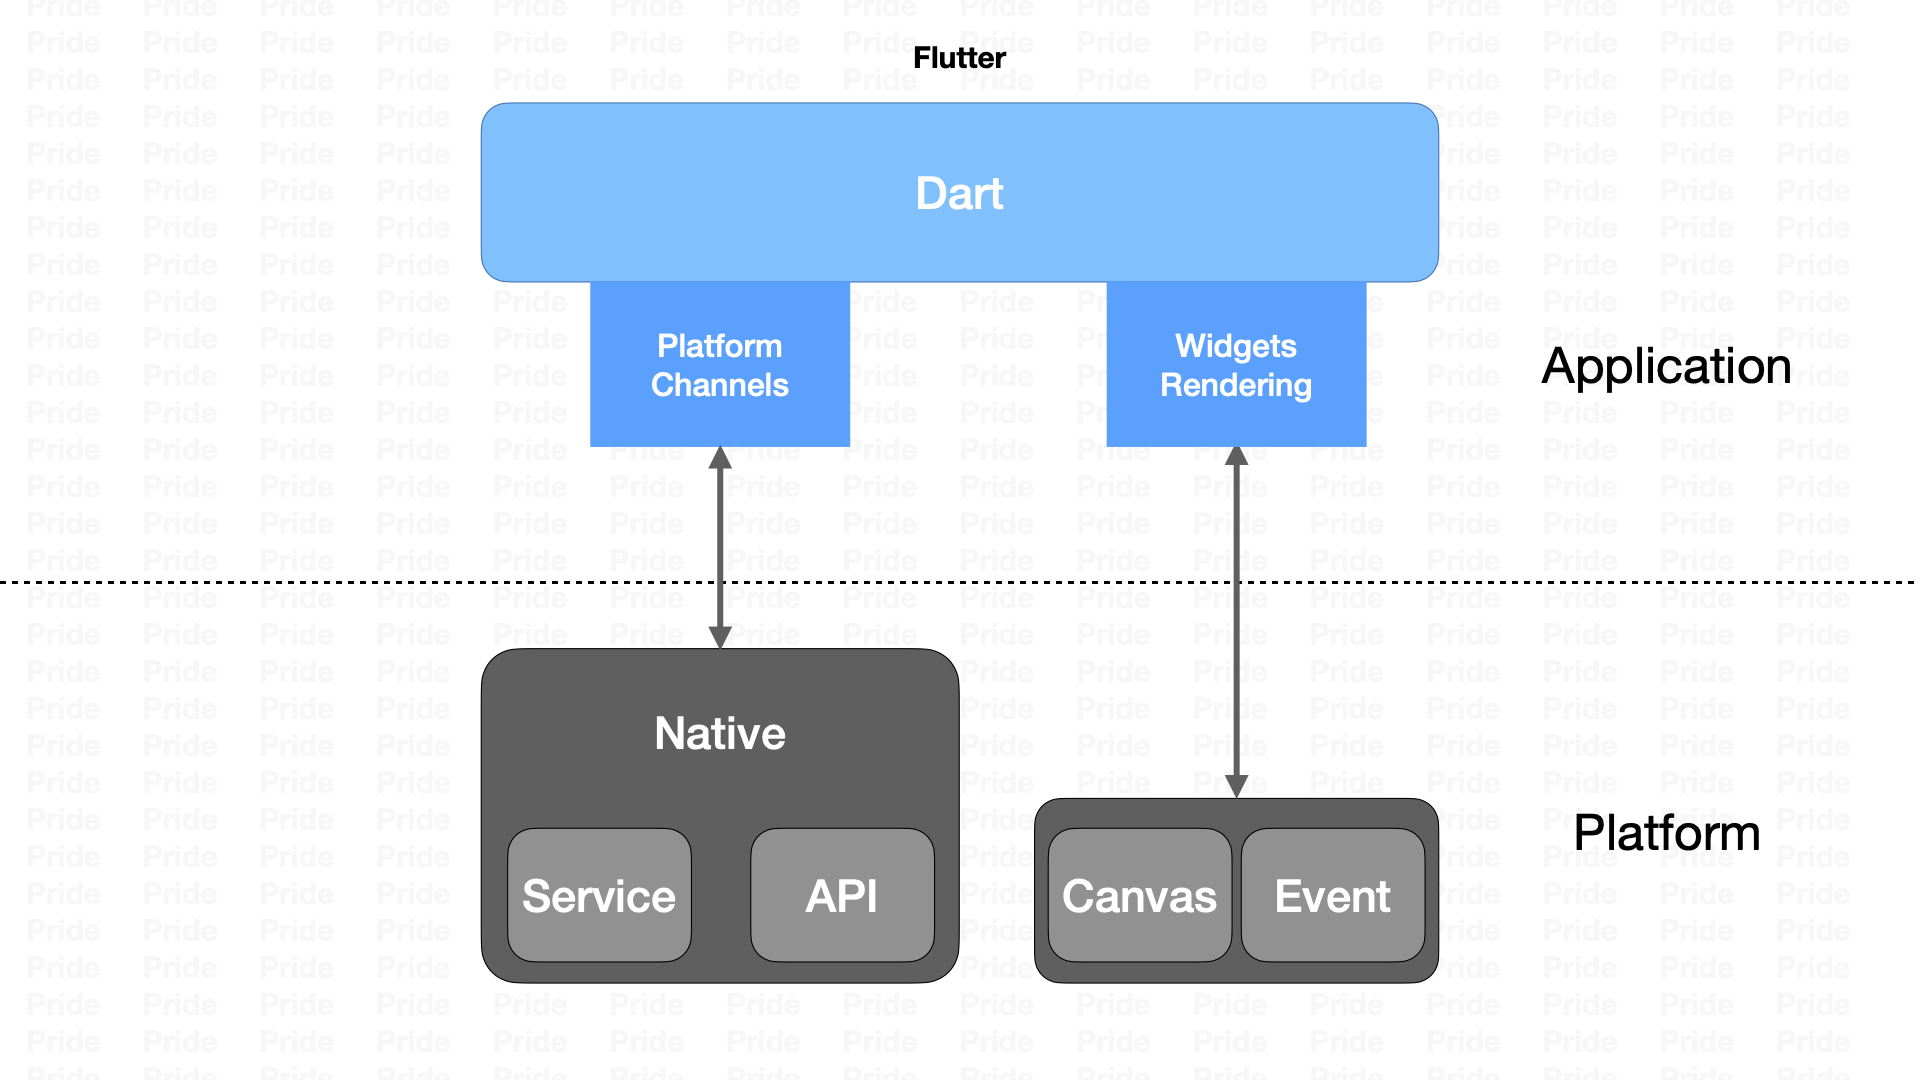
在Flutter种采用了一种叫「自绘引擎」的方案,和过去的几种都不一样;不使用Webview或是原生组件进行渲染,自己设计了一套UI渲染框架,通过跨平台的Skia图形库来实现渲染,容器层只作为一块画布。减少了差异性,同时通信上使用了「平台信道」的方案,在性能上优于前两种方式。Flutter在编译成release版本后,会生成对应的二进制文件,提升了安全性和渲染性能,但是相对的也丧失了一部分动态性。
2.React Native的设计§
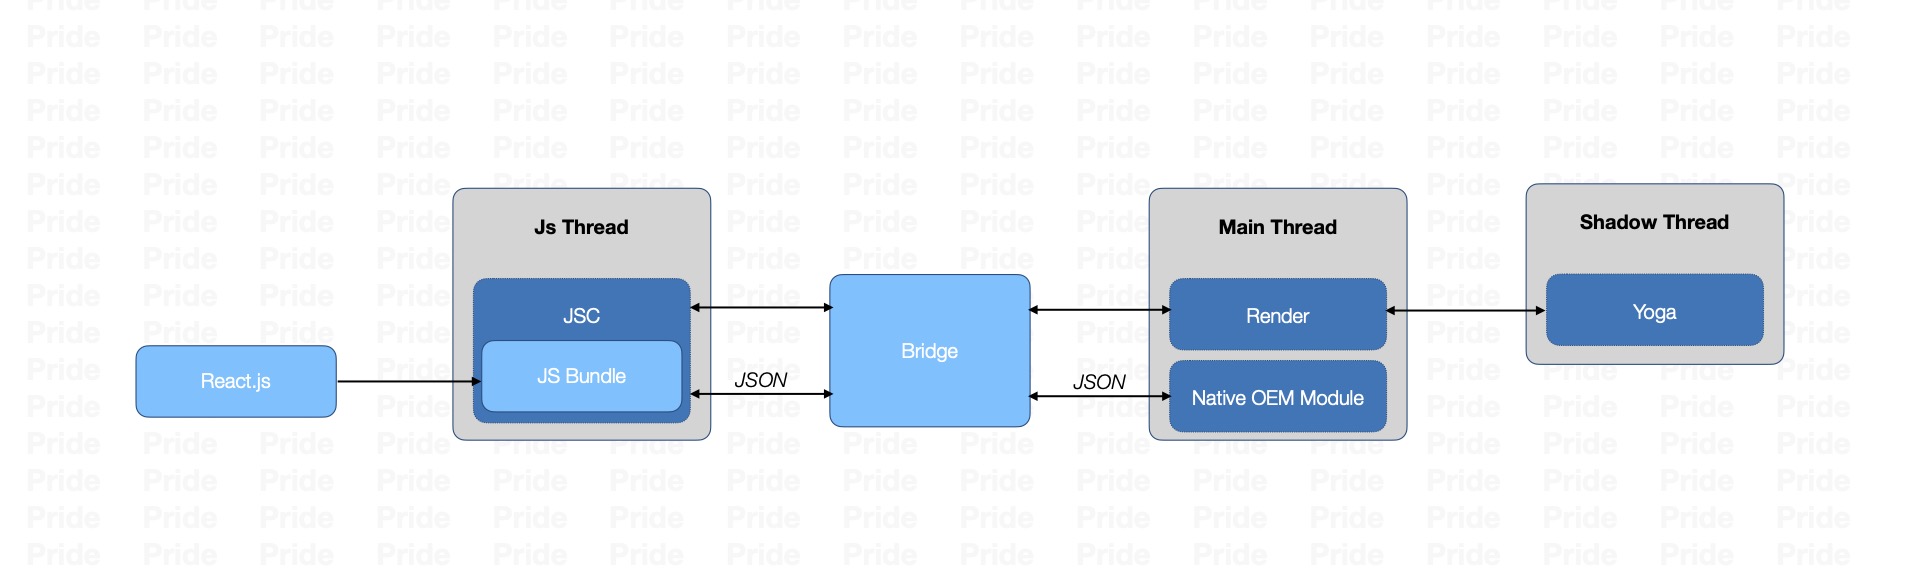
React Native的架构主要包含React、JavaScript、Bridge和Native四个部分,从上到下分为四层结构,分别为JS逻辑层、JS引擎层、通信层、原生层。在最顶部的JS代码层提供了React.js的支持,React.js的JSX代码转化为JS代码运行在JavaScriptCore提供的 JavaScript 运行时环境中,通信层将JavaScript 与 Native 层联系起来,来处理和传递消息事件;通信层又可以分为三部分,其中ShadowTree用来定义UI效果和交互功能,Native Modules来提供Native能力和一些API,两者之间使用JSON异步传递消息。
按照上述设计,React Native在运行时会创建三个线程:
- 「JS Thread」:负责React / JS的执行,输出对应的视图组件。
- 「Shadow Thread」:根据JS线程的视图信息,创建出用于布局计算的ShadowTree;主要用到UIManagerModule,是RN中非常重要的Native Module,故也叫Native Module Thread;
- 「Main Thread」:根据ShadowTree提供的完整视图信息,负责创建NativeView。
3.设计思想§
- 数据获取
- 状态更新
- 页面渲染
4.优势§
- 动态化
- 开发维护成本
下面将从启动流程、渲染原理、通信机制三块来剖析React Native的实现原理。
二、启动流程§
简单来说,启动时ReactNative主要做了两件事情:准备环境和调用JS入口函数。
- 准备环境:主要是做了以下,初始化上下文、初始化通信桥、加载JSBundle、初始化JS执行环境。
- 调用JS入口函数:即调用AppRegistry.js中的runApplication方法,为一次Native到JS的调用。
三、渲染原理§
1.加载流程§
在此之前,我们需要了解JS是如何被加载的,JS加载的方式可以是从本地加载与远程地址加载。在前面的启动流程中,说到过在创建绑定上下文之前会去加载JS。
public class ReactInstanceManager {
  /**
   * Trigger react context initialization asynchronously in a background async task. This enables
   * applications to pre-load the application JS, and execute global code before {@link
   * ReactRootView} is available and measured.
   *
   * <p>Called from UI thread.
   */
  @ThreadConfined(UI)
  public void createReactContextInBackground() {
    FLog.d(TAG, "ReactInstanceManager.createReactContextInBackground()");
    UiThreadUtil
        .assertOnUiThread(); // Assert before setting mHasStartedCreatingInitialContext = true
    if (!mHasStartedCreatingInitialContext) {
      mHasStartedCreatingInitialContext = true;
      recreateReactContextInBackgroundInner();
    }
  }

 /**
   * Recreate the react application and context. This should be called if configuration has changed
   * or the developer has requested the app to be reloaded. It should only be called after an
   * initial call to createReactContextInBackground.
   *
   * <p>Called from UI thread.
   */
  @ThreadConfined(UI)
  public void recreateReactContextInBackground() {
    Assertions.assertCondition(
        mHasStartedCreatingInitialContext,
        "recreateReactContextInBackground should only be called after the initial "
            + "createReactContextInBackground call.");
    recreateReactContextInBackgroundInner();
  }

  @ThreadConfined(UI)
  private void recreateReactContextInBackgroundInner() {
    FLog.d(TAG, "ReactInstanceManager.recreateReactContextInBackgroundInner()");
    PrinterHolder.getPrinter()
        .logMessage(ReactDebugOverlayTags.RN_CORE, "RNCore: recreateReactContextInBackground");
    UiThreadUtil.assertOnUiThread();

    // 开发模式,实时更新bundle
    if (mUseDeveloperSupport && mJSMainModulePath != null) {
      final DeveloperSettings devSettings = mDevSupportManager.getDevSettings();

      if (!Systrace.isTracing(TRACE_TAG_REACT_APPS | TRACE_TAG_REACT_JS_VM_CALLS)) {
        if (mBundleLoader == null) {
          mDevSupportManager.handleReloadJS();
        } else {
          mDevSupportManager.isPackagerRunning(
              new PackagerStatusCallback() {
                @Override
                public void onPackagerStatusFetched(final boolean packagerIsRunning) {
                  UiThreadUtil.runOnUiThread(
                      new Runnable() {
                        @Override
                        public void run() {
                          // 加载JS
                          if (packagerIsRunning) {
                            mDevSupportManager.handleReloadJS();
                          // 判断是否处于开发者模式,从dev server中获JSBundle,如果不是就从本地文件获取
                          } else if (mDevSupportManager.hasUpToDateJSBundleInCache()
                              && !devSettings.isRemoteJSDebugEnabled()
                              && !mUseFallbackBundle) {
                            // If there is a up-to-date bundle downloaded from server,
                            // with remote JS debugging disabled, always use that.
                            onJSBundleLoadedFromServer();
                          } else {
                            // If dev server is down, disable the remote JS debugging.
                            devSettings.setRemoteJSDebugEnabled(false);
                            recreateReactContextInBackgroundFromBundleLoader();
                          }
                        }
                      });
                }
              });
        }
        return;
      }
    }

    // 线上读JSBundle
    recreateReactContextInBackgroundFromBundleLoader();
  }

  @ThreadConfined(UI)
  private void recreateReactContextInBackgroundFromBundleLoader() {
    FLog.d(TAG, "ReactInstanceManager.recreateReactContextInBackgroundFromBundleLoader()");
    PrinterHolder.getPrinter()
        .logMessage(ReactDebugOverlayTags.RN_CORE, "RNCore: load from BundleLoader");
    recreateReactContextInBackground(mJavaScriptExecutorFactory, mBundleLoader);
  }

}
接着就是handleReloadJS方法的具体实现
  @Override
  public void handleReloadJS() {

    UiThreadUtil.assertOnUiThread();

    ReactMarker.logMarker(
        ReactMarkerConstants.RELOAD,
        getDevSettings().getPackagerConnectionSettings().getDebugServerHost());

    // dismiss redbox if exists
    hideRedboxDialog();

    if (getDevSettings().isRemoteJSDebugEnabled()) {
      PrinterHolder.getPrinter()
          .logMessage(ReactDebugOverlayTags.RN_CORE, "RNCore: load from Proxy");
      showDevLoadingViewForRemoteJSEnabled();
      reloadJSInProxyMode();
    } else {
      PrinterHolder.getPrinter()
          .logMessage(ReactDebugOverlayTags.RN_CORE, "RNCore: load from Server");
      // getJSAppBundleName() 方法会获取到mJSAppBundleName
      String bundleURL =
          getDevServerHelper()
              .getDevServerBundleURL(Assertions.assertNotNull(getJSAppBundleName()));
      reloadJSFromServer(bundleURL);
    }
  }
最终通过mJSAppBundleName、platform、dev拼接构建出bundleURL,记录了整个JSBundle的位置信息以及版本信息。
DevSupportManager.handleReloadJS()调用reloadJSFromServer(bundleURL)来加载Bundle,最终通过BundleDownloader来加JSBundle。
public class BundleDownloader {
      public void downloadBundleFromURL(
      final DevBundleDownloadListener callback,
      final File outputFile,
      final String bundleURL,
      final @Nullable BundleInfo bundleInfo,
      Request.Builder requestBuilder) {

    final Request request =
        requestBuilder.url(bundleURL).addHeader("Accept", "multipart/mixed").build();
    mDownloadBundleFromURLCall = Assertions.assertNotNull(mClient.newCall(request));
    mDownloadBundleFromURLCall.enqueue(
        new Callback() {
          @Override
          public void onFailure(Call call, IOException e) {
            // ignore callback if call was cancelled
            if (mDownloadBundleFromURLCall == null || mDownloadBundleFromURLCall.isCanceled()) {
              mDownloadBundleFromURLCall = null;
              return;
            }
            mDownloadBundleFromURLCall = null;

            String url = call.request().url().toString();

            callback.onFailure(
                DebugServerException.makeGeneric(
                    url, "Could not connect to development server.", "URL: " + url, e));
          }

          @Override
          public void onResponse(Call call, final Response response) throws IOException {
            // ignore callback if call was cancelled
            if (mDownloadBundleFromURLCall == null || mDownloadBundleFromURLCall.isCanceled()) {
              mDownloadBundleFromURLCall = null;
              return;
            }
            mDownloadBundleFromURLCall = null;

            final String url = response.request().url().toString();

            // Make sure the result is a multipart response and parse the boundary.
            String contentType = response.header("content-type");
            Pattern regex = Pattern.compile("multipart/mixed;.*boundary=\"([^\"]+)\"");
            Matcher match = regex.matcher(contentType);
            try (Response r = response) {
              if (match.find()) {
                processMultipartResponse(url, r, match.group(1), outputFile, bundleInfo, callback);
              } else {
                // In case the server doesn't support multipart/mixed responses, fallback to normal
                // download.
                processBundleResult(
                    url,
                    r.code(),
                    r.headers(),
                    Okio.buffer(r.body().source()),
                    outputFile,
                    bundleInfo,
                    callback);
              }
            }
          }
        });
  }
}
使用OkHttp来处理下载任务,不管是Local Host还是Server Host都进行了统一处理,在Response中将返回数据写入到本地存储:
- callback(DevBundleDownloadListener): 下载回调
- outputFile(File): Bundle缓存地址
2.渲染原理§
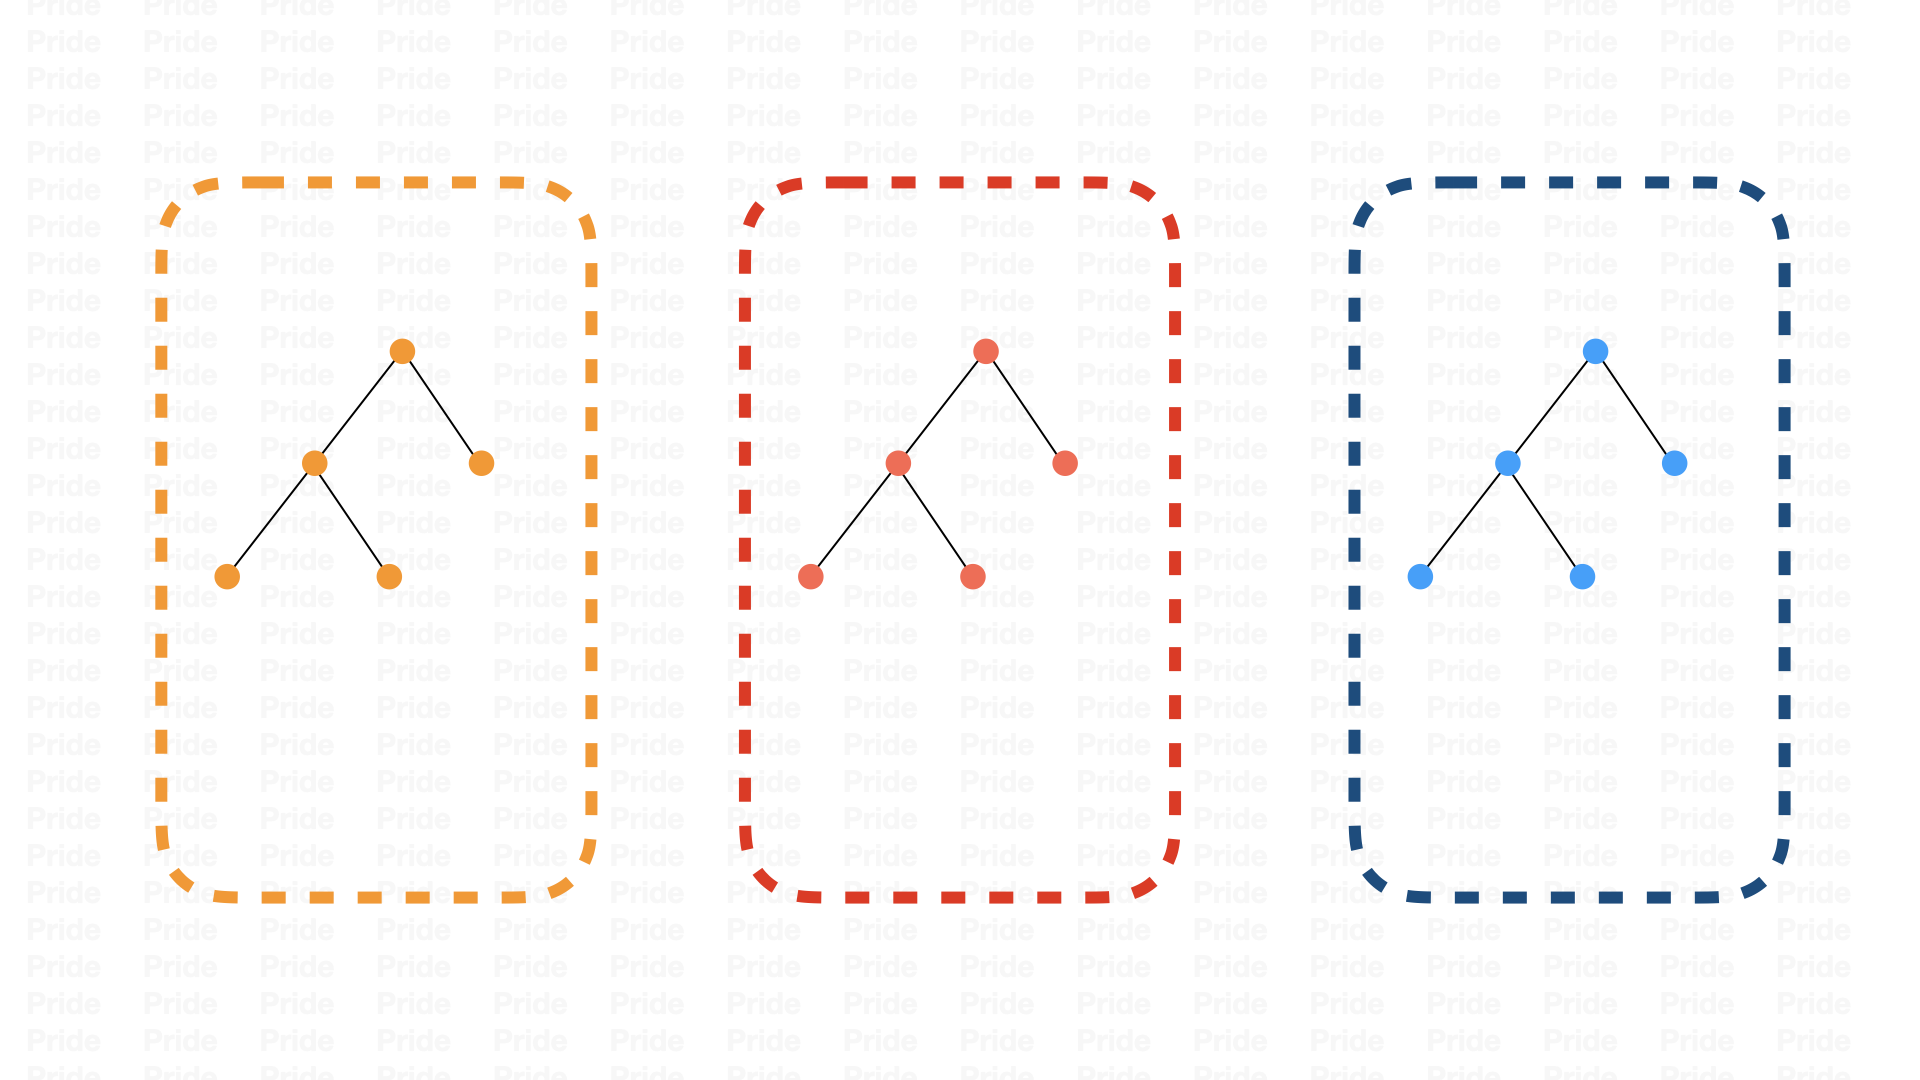
React Native 运行时会创建三个线程:JS Thread、Shadow Thread、Main Thread,在这三个线程中分别创建三棵树,JS线程中会创建一个Fiber Tree,Shadow线程中会创建一棵Shadow Tree,在UI线程中则是View Tree;Fiber Tree在JS侧创建,Shadow Tree和View Tree在Native侧创建,RN渲染机制的重点就是这三棵树的创建和同步。
流程:
- 通过React.js的JSX来创建UI结构
- 通过Bubble将JSX转化为React.creatElement的形态,转化出ReactElement组件(定义ReactElement.js文件中),用来描述JS上的UI组件,存放了props等信息
- JS侧在创建Fiber Tree各个节点的时候通过JSBridge向Native发送对应的指令,Native收到指令后创建对应的Shadow Tree节点,生成对应的UIViewOperation,并加入到UIViewOperationQueue中。JS侧发送完一批UI指令后会触发Native侧的onBatchComplete()回调,从而后续遍历Shadow Tree,分别计算每个节点的宽高,再前序遍历ShadowTree,确定每个节点的最终位置,生成对应的UpdateLayoutOperation,加入到UIViewOperationQueue中
- 通过FrameCallback,从UIViewOperationQueue中依次取出UIViewOperation,生成对应的View Tree,挂载到RootView,通过UIManagerModule::createView进行原生UI渲染逻辑
四、通信机制§
在RN中有三个线程:JS线程、UI线程、Shadow线程(Native Modules线程),而在Native Modules线程中,主要用来进行Yoga布局计算,同时也负责C++层和原生通信。我们知道Java可以通过JNI的方式和C++代码实现相互调用,JS 可以通过 JavaScriptCore 实现和C++的相互调用,而JavaScriptCore是由C++实现的JS引擎,所以很自然的,C++成为了连接Java和JS的桥梁。
所以RN的通信机制总结起来就是一句话:一个C++实现的桥打通了Java和JS,实现了两者的相互调用。
1.Bridge初始化§
在ReactNative的启动流程中,会对Bridge进行初始化,这个过程中最关键的就是创建了两张表和建立了两个Bridge;两张表中,一张是JavaScriptModuleRegistry,供Java调用JS,一张是NativeModuleRegistry,供JS调用Java;两Bridge,一个是NativeToJSBridge,提供给Java调JS,一个是JsToNativeBridge提供给JS调Java。
(1)JavaScriptModuleRegistry§
- JavaScriptModule: JS Module的通用接口类,所有的JS Module都将继承自此接口,其表示在JS层会有一个相同名字的.js文件,文件实现了该接口定义的方法,JavaScriptModuleRegistry会利用动态代理将这个接口生成代理类,通过C++传递给JS层,进而调用JS层方法。
- JavaScriptModuleRegistration: 用来描述JavaScriptModule相关信息,利用反射获取接口里定义的Method。
- JavaScriptModuleRegistry: JS Module注册表,内部维护了一个HashMap<Class<? extends JavaScriptModule>, JavaScriptModuleRegistration>,利用动态代理生成接口JavaScriptModule对应的代理类,再通过C++传递到JS层,从而调用JS层的方法。
(2)NativeModuleRegistry§
- NativeModule: 一个接口类,实现该接口就可以被JS层调用,为JS层提供Java API时通常会继承 BaseJavaModule/ReactContextBaseJavaModule 来实现NativeModule接口。
- ModuleHolder: NativeModule的一个Holder类,可以实现NativeModule的懒加载。
- NativeModuleRegistry: 内部持有Map<Class<? extends NativeModule>, ModuleHolder>,可以遍历并返回NativeModule供调用者使用。
2.Bridge实现流程§
Native调用JS§
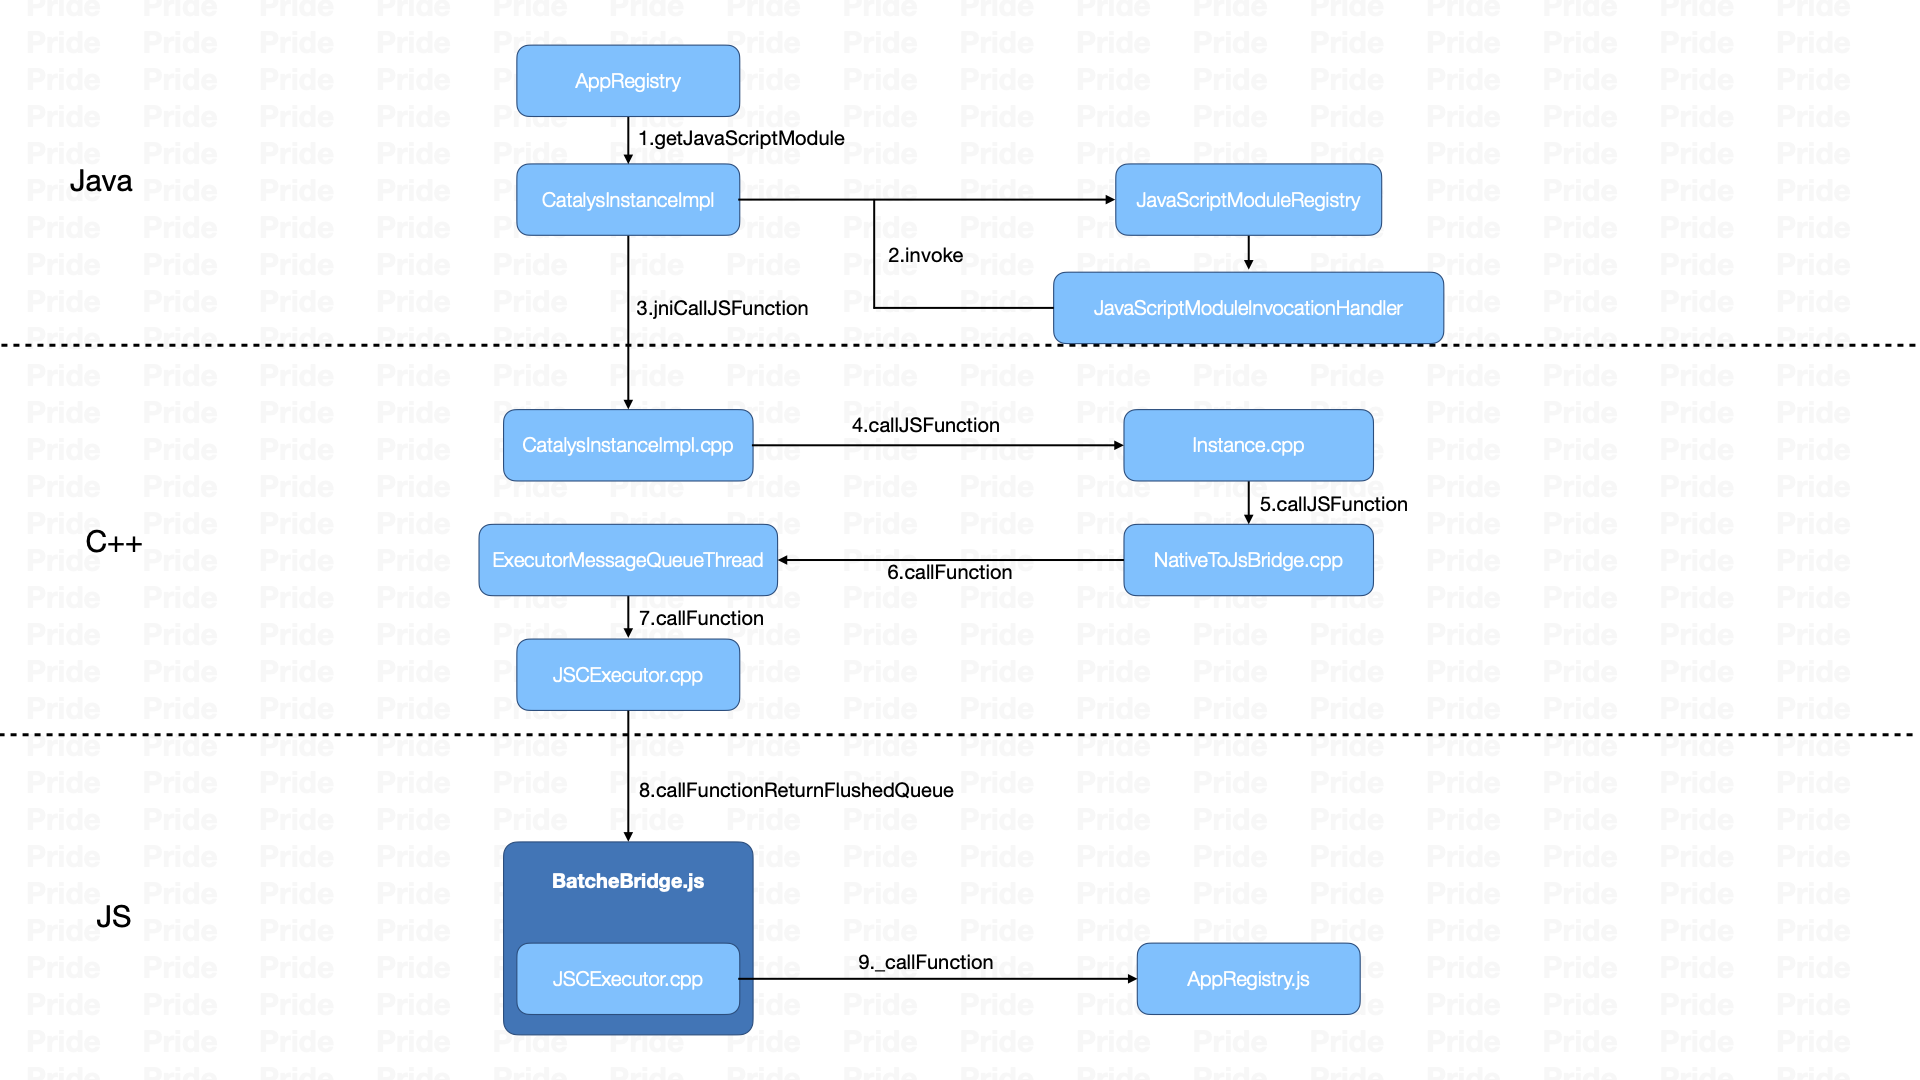
- Java层编写接口并继承JavaScriptModule,由ReactPackage统一管理,最后在React Native初始化完成后,添加到JavaScriptModuleRegistry注册表中。
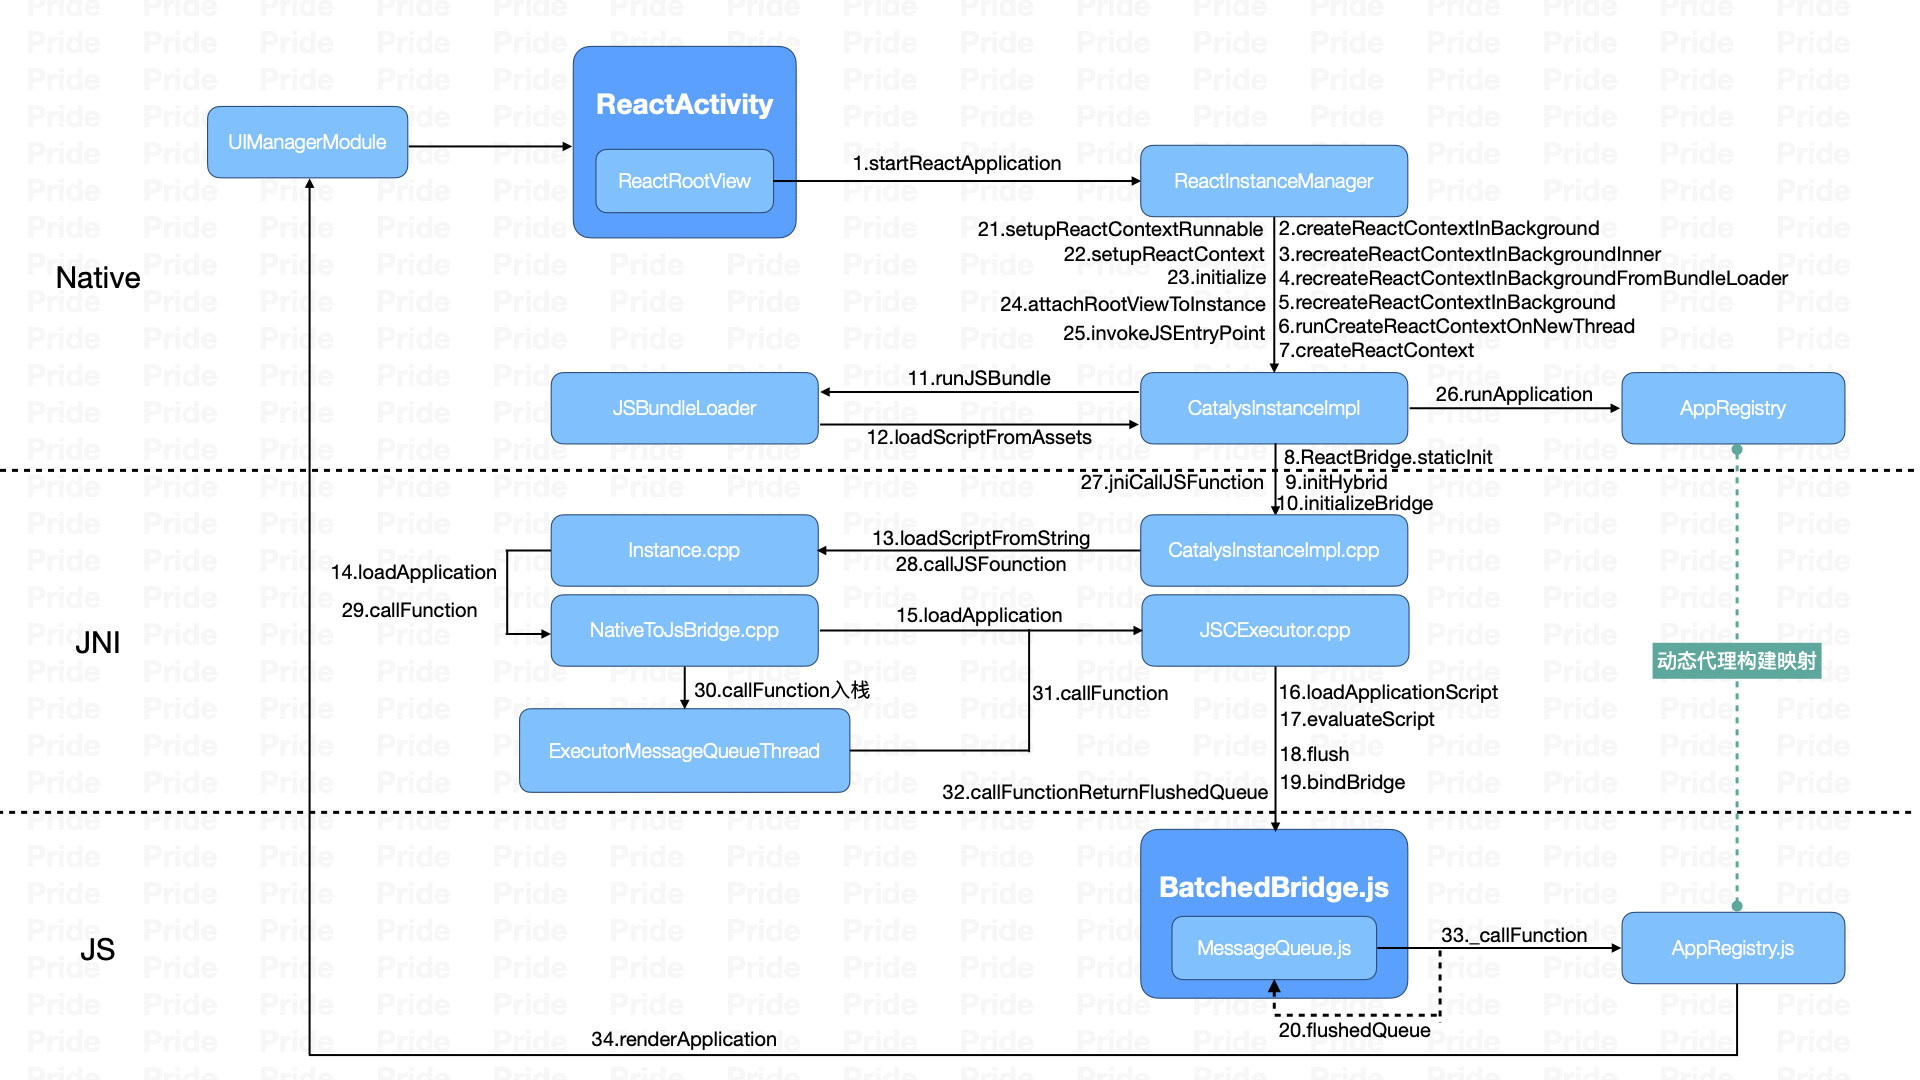
- JavaScriptModuleRegistry通过动态代理生成对应的JavaScriptModule,通过invoke()调用相应的JS方法,然后进一步调用CatalystInstanceImpl.callJSFunction(),最终通过JNI把相关的参数传递到C++层。
- C++层通过NativeToJSBridge将callFunction的消息放入消息队列等待执行;C++层中存有MessageQueue.js中的一些属性对象,通过这些属性对象进入JS层。
- 在JS层,找到相对应的JavaScriptModule和方法并执行
JS调用Native§
在这里,分为两种调用方法:
- 同步调用:指的是调用和处理过程都发生在JS线程中,如果运算逻辑较为简单,没有影响;如果运算逻辑复杂会导致JS线程阻塞
- 异步调用:指的是在JSToNative的通信方式中,调用的发起在JS线程,逻辑处理和计算在Native Module线程和UI线程,异步的方式不会阻塞JS线程
异步调用§
整个流程可以分为 JS调用Native 和 Native将执行结果回调到JS侧(与Native调用JS的流程相似)
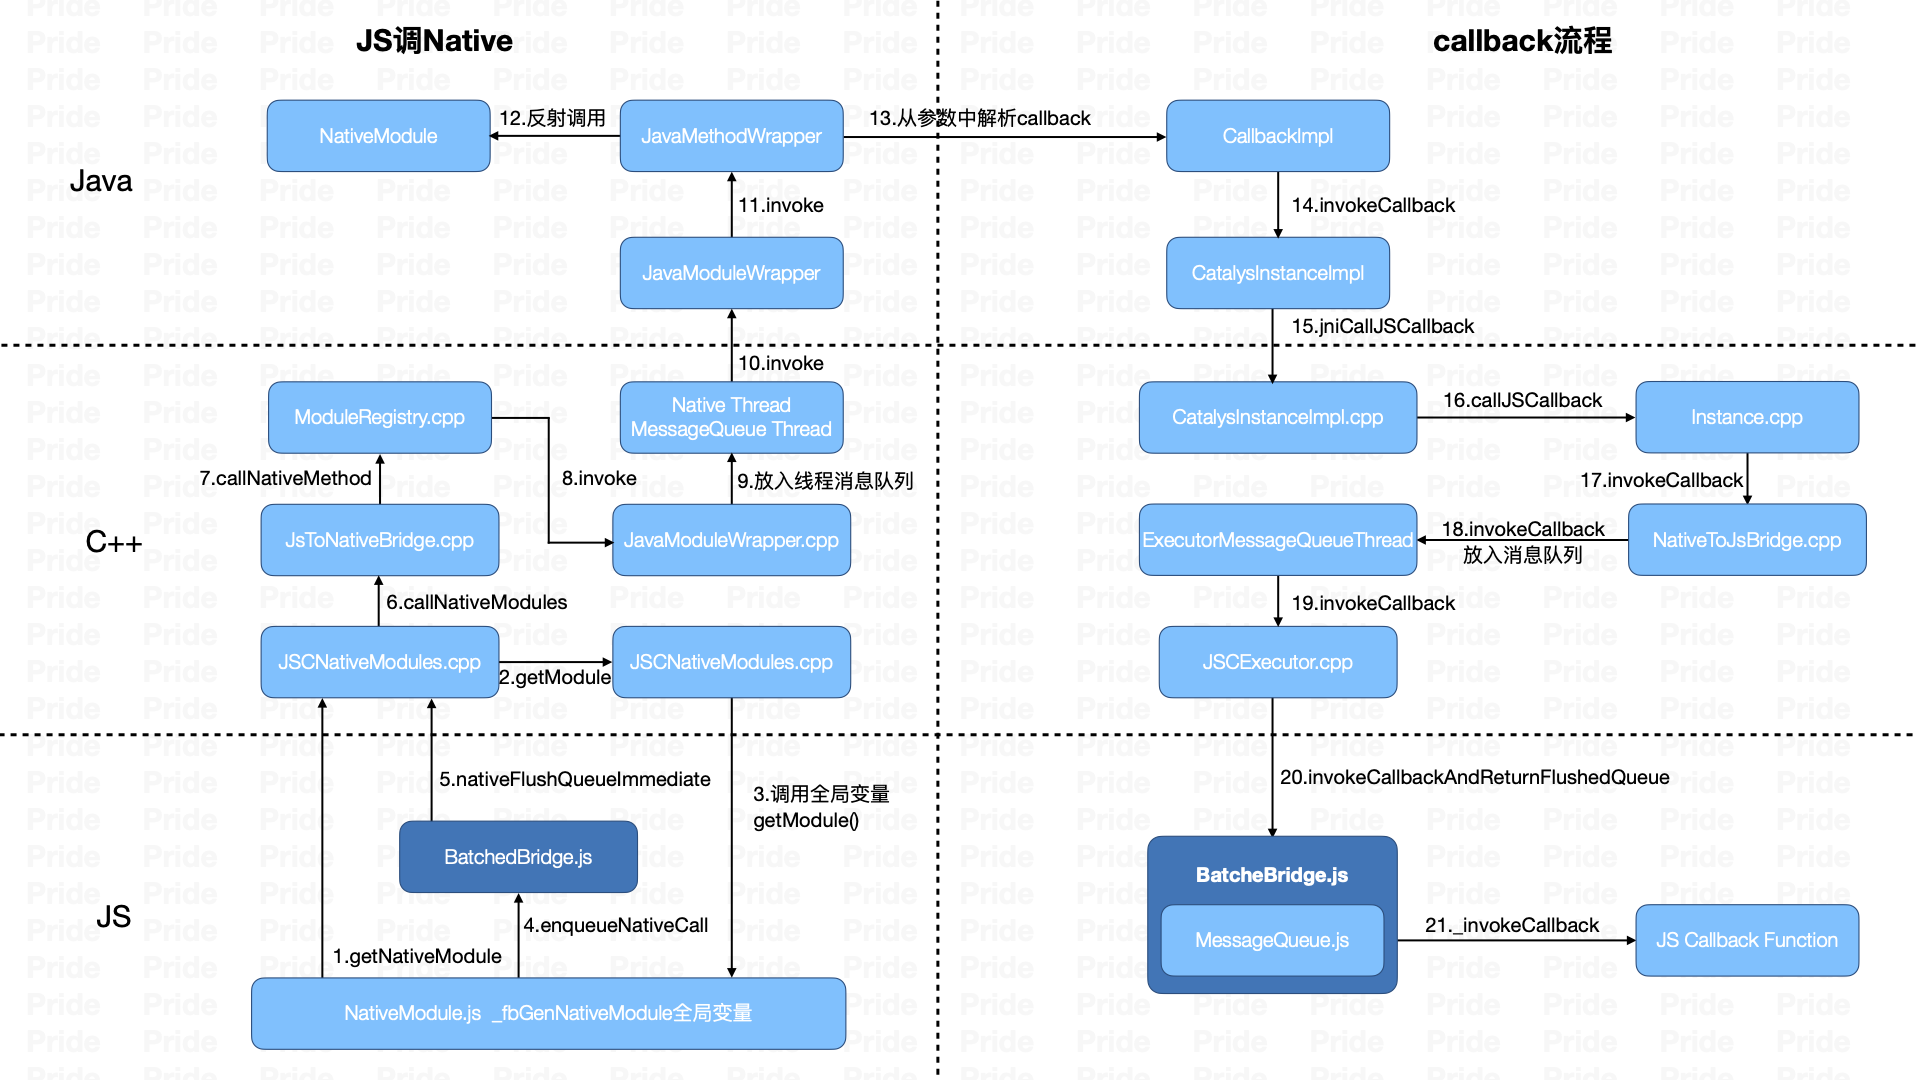
JS调用Native:
- 从JS侧进入C++层,通过JSC桥接获取Java Module的注册表,然后回到JS侧,把它转换为对应的JS Native Module(属性、方法转换),并根据不同的调用类型,将xxMethod()的调用封装成消息,放入了MessageQueue的队列中。
- xxMethod()消息处理的时候,会进入C++层,拿到对应的module信息,通过JSToNativeBridge,将该函数调用消息放入到线程的消息队列中等到执行。此时C++层的函数调用被映射为同名的Java层JavaModuleWrapper对象,并调用其中的invoke方法,传入的参数是methodId和对应的参数信息。
- Java层的JavaModuleWrapper对象,根据参数信息,找到对应的JavaMethodWrapper对象。在执行其invoke方法中,通过反射调用对应的NativeModule,从而完成JS到Native的调用
- JS到Native的调用的时候,会将callback和参数放在一起传入到Java层,在Java层执行Native Module的时候会解析出callback参数。等执行完成,将结果通过callback返回给JS 侧,这一过程就是一个Native调用JS的过程,只不过调用的方法变成了invokeCallback
3.动态代理§
动态代理和静态代理§
- 静态代理: 代码运行前代理类就已经存在; 从JVM角度看,静态代理在编译时会将接口、实现类、代理类编译成为一个个class文件
- 动态代理: 代理类在程序运行时创建; 代理类在程序运行时被创建的代理方式被称作为动态代理。
动态代理实现§
- 静态代理,工程师编辑代理类代码,实现代理模式;在编译期就生成了代理类。
- 基于 JDK 实现动态代理,通过jdk提供的工具方法Proxy.newProxyInstance动态构建全新的代理类(继承Proxy类,并持有InvocationHandler接口引用 )字节码文件并实例化对象返回。(jdk动态代理是由java内部的反射机制来实例化代理对象,并代理的调用委托类方法)
- 基于CGlib 动态代理模式 基于继承被代理类生成代理子类,不用实现接口。只需要被代理类是非final 类即可。(cglib动态代理底层是借助asm字节码技术
- 基于 Aspectj 实现动态代理(修改目标类的字节,织入代理的字节,在程序编译的时候 插入动态代理的字节码,不会生成全新的Class )
- 基于 instrumentation 实现动态代理(修改目标类的字节码、类装载的时候动态拦截去修改,基于javaagent) -javaagent:spring-instrument-4.3.8.RELEASE.jar (类装载的时候 插入动态代理的字节码,不会生成全新的Class )
动态代理在React Native的实现§
  private static class JavaScriptModuleInvocationHandler implements InvocationHandler {
    private final CatalystInstance mCatalystInstance;
    private final Class<? extends JavaScriptModule> mModuleInterface;
    private @Nullable String mName;

    public JavaScriptModuleInvocationHandler(
        CatalystInstance catalystInstance, Class<? extends JavaScriptModule> moduleInterface) {
      mCatalystInstance = catalystInstance;
      mModuleInterface = moduleInterface;

      if (ReactBuildConfig.DEBUG) {
        Set<String> methodNames = new HashSet<>();
        for (Method method : mModuleInterface.getDeclaredMethods()) {
          if (!methodNames.add(method.getName())) {
            throw new AssertionError(
                "Method overloading is unsupported: "
                    + mModuleInterface.getName()
                    + "#"
                    + method.getName());
          }
        }
      }
    }

    private String getJSModuleName() {
      if (mName == null) {
        // Getting the class name every call is expensive, so cache it
        mName = JavaScriptModuleRegistry.getJSModuleName(mModuleInterface);
      }
      return mName;
    }

    @Override
    public @Nullable Object invoke(Object proxy, Method method, @Nullable Object[] args)
        throws Throwable {
      NativeArray jsArgs = args != null ? Arguments.fromJavaArgs(args) : new WritableNativeArray();
      mCatalystInstance.callFunction(getJSModuleName(), method.getName(), jsArgs);
      return null;
    }
  }
React Native的动态代理类在CatalystInstanceImpl被初始化,其继承实现了InvocationHandler接口,每个代理类的实例都关联到了一个handler,当通过代理对象调用一个方法的时候,这个方法的调用就会被转发为InvocationHandler的invoke方法来调用,重写的invoke方法将args转化为NativeArray对象,走到callFunction方法。
@DoNotStrip
public class CatalystInstanceImpl implements CatalystInstance {
  @Override
  public void callFunction(final String module, final String method, final NativeArray arguments) {
    callFunction(new PendingJSCall(module, method, arguments));
  }

  public void callFunction(PendingJSCall function) {
    if (mDestroyed) {
      final String call = function.toString();
      FLog.w(ReactConstants.TAG, "Calling JS function after bridge has been destroyed: " + call);
      return;
    }
    if (!mAcceptCalls) {
      // Most of the time the instance is initialized and we don't need to acquire the lock
      synchronized (mJSCallsPendingInitLock) {
        if (!mAcceptCalls) {
          mJSCallsPendingInit.add(function);
          return;
        }
      }
    }
    function.call(this);
  }

  private native void jniCallJSCallback(int callbackID, NativeArray arguments);
}
方法走到这里,实现逻辑已经从Java转向C++层,这个方法在C++层有个对应的CatalystInstanceImpl.cpp类
void CatalystInstanceImpl::jniCallJSFunction(
    std::string module,
    std::string method,
    NativeArray *arguments) {
  // We want to share the C++ code, and on iOS, modules pass module/method
  // names as strings all the way through to JS, and there's no way to do
  // string -> id mapping on the objc side.  So on Android, we convert the
  // number to a string, here which gets passed as-is to JS.  There, they they
  // used as ids if isFinite(), which handles this case, and looked up as
  // strings otherwise.  Eventually, we'll probably want to modify the stack
  // from the JS proxy through here to use strings, too.
  instance_->callJSFunction(
      std::move(module), std::move(method), arguments->consume());
}
在这里jniCallJSFunction()方法会去调用Instance.cpp中的callJSFunction()方法。
void Instance::callJSFunction(
std::string &&module,
std::string &&method,
folly::dynamic &¶ms) {
callback_->incrementPendingJSCalls();
nativeToJsBridge_->callFunction(
std::move(module), std::move(method), std::move(params));
}
Instance.cpp的callJSFunction()会继续去调用NativeToJsBridge.cpp的callFunction()方法。
void NativeToJsBridge::callFunction(
    std::string &&module,
    std::string &&method,
    folly::dynamic &&arguments) {
  int systraceCookie = -1;
#ifdef WITH_FBSYSTRACE
  systraceCookie = m_systraceCookie++;
  FbSystraceAsyncFlow::begin(
      TRACE_TAG_REACT_CXX_BRIDGE, "JSCall", systraceCookie);
#endif

  runOnExecutorQueue([this,
                      module = std::move(module),
                      method = std::move(method),
                      arguments = std::move(arguments),
                      systraceCookie](JSExecutor *executor) {
    if (m_applicationScriptHasFailure) {
      LOG(ERROR)
          << "Attempting to call JS function on a bad application bundle: "
          << module.c_str() << "." << method.c_str() << "()";
      throw std::runtime_error(
          "Attempting to call JS function on a bad application bundle: " +
          module + "." + method + "()");
    }

#ifdef WITH_FBSYSTRACE
    FbSystraceAsyncFlow::end(
        TRACE_TAG_REACT_CXX_BRIDGE, "JSCall", systraceCookie);
    SystraceSection s(
        "NativeToJsBridge::callFunction", "module", module, "method", method);
#else
    (void)(systraceCookie);
#endif
    // This is safe because we are running on the executor's thread: it won't
    // destruct until after it's been unregistered (which we check above) and
    // that will happen on this thread
    executor->callFunction(module, method, arguments);
  });
}
会进一步调用JSCExcutor的callFunction方法。
void JSCExecutor::callFunction(
    const std::string &moduleId,
    const std::string &methodId,
    const folly::dynamic &arguments) {
  SystraceSection s(
      "JSCExecutor::callFunction", "moduleId", moduleId, "methodId", methodId);
  if (!callFunctionReturnFlushedQueue_) {
    bindBridge();
  }

  // Construct the error message producer in case this times out.
  // This is executed on a background thread, so it must capture its parameters
  // by value.
  auto errorProducer = [=] {
    std::stringstream ss;
    ss << "moduleID: " << moduleId << " methodID: " << methodId
       << " arguments: " << folly::toJson(arguments);
    return ss.str();
  };

  Value ret = Value::undefined();
  try {
    scopedTimeoutInvoker_(
        [&] {
          ret = callFunctionReturnFlushedQueue_->call(
              *runtime_,
              moduleId,
              methodId,
              valueFromDynamic(*runtime_, arguments));
        },
        std::move(errorProducer));
  } catch (...) {
    std::throw_with_nested(
        std::runtime_error("Error calling " + moduleId + "." + methodId));
  }

  performMicrotaskCheckpoint(*runtime_);

  callNativeModules(ret, true);
}
这里会进一步调用callFunctionReturnFlushedQueueJS_的call方法,而callFunctionReturnFlushedQueueJS_变量是在bindBridge里面实现的,究其根本就是通过WebKit JSC拿到JS层代码相关的对象和方法引用,
void JSCExecutor::bindBridge() {
  std::call_once(bindFlag_, [this] {
    SystraceSection s("JSCExecutor::bindBridge (once)");
    Value batchedBridgeValue =
        runtime_->global().getProperty(*runtime_, "__fbBatchedBridge");
    if (batchedBridgeValue.isUndefined() || !batchedBridgeValue.isObject()) {
      throw JSCNativeException(
          "Could not get BatchedBridge, make sure your bundle is packaged correctly");
    }

    Object batchedBridge = batchedBridgeValue.asObject(*runtime_);
    callFunctionReturnFlushedQueue_ = batchedBridge.getPropertyAsFunction(
        *runtime_, "callFunctionReturnFlushedQueue");
    invokeCallbackAndReturnFlushedQueue_ = batchedBridge.getPropertyAsFunction(
        *runtime_, "invokeCallbackAndReturnFlushedQueue");
    flushedQueue_ =
        batchedBridge.getPropertyAsFunction(*runtime_, "flushedQueue");
  });
}
最后到JS层中,体现在MessageQueue的callFunctionReturnFlushedQueue方法
  callFunctionReturnFlushedQueue(
    module: string,
    method: string,
    args: mixed[],
  ): null | [Array<number>, Array<number>, Array<mixed>, number] {
    this.__guard(() => {
      this.__callFunction(module, method, args);
    });

    return this.flushedQueue();
  }

  // 走到这里已经是最后的方法执行了
  __callFunction(module: string, method: string, args: mixed[]): void {
    this._lastFlush = Date.now();
    this._eventLoopStartTime = this._lastFlush;
    if (__DEV__ || this.__spy) {
      Systrace.beginEvent(`${module}.${method}(${stringifySafe(args)})`);
    } else {
      Systrace.beginEvent(`${module}.${method}(...)`);
    }
    if (this.__spy) {
      this.__spy({type: TO_JS, module, method, args});
    }
    // 从JS层的JavaScriptModule注册表中查到AppRegistry.js
    const moduleMethods = this.getCallableModule(module);
    invariant(
      !!moduleMethods,
      `Module ${module} is not a registered callable module (calling ${method}). A frequent cause of the error is that the application entry file path is incorrect.
      This can also happen when the JS bundle is corrupt or there is an early initialization error when loading React Native.`,
    );
    invariant(
      !!moduleMethods[method],
      `Method ${method} does not exist on module ${module}`,
    );
    moduleMethods[method].apply(moduleMethods, args);
    Systrace.endEvent();
  }
从JS层的JavaScriptModule中查到AppRegistry.js,并调用其runApplication方法。
如此整个动态代理逻辑即已实现。
五、思考§
在实际的工作中,跨端是为了什么,或者说,跨端方案给我们带来了什么收益?
按照我不多的经验来总结,跨端方案的出现是一个必然,从大的角度来看,总体的收益是降低了研发人员的研发成本与维护成本,从一定程度上保证了双端甚至多端的一致性。但仅此来看是不完整的,细分到各个领域来阐述。
PWA小程序方案所做的并不是为了更好的性能,甚至于PWA小程序方案在某种程度上是一种性能降级;但大面积的铺开必定有其优势,在我看来,其优势就是能在一定程度上,以及一定规模上打造生态闭环,能有更多的第三方接入能力;以至于微信小程序如今能发展成一种可以与应用市场匹敌的状态;2017年的某天,微信悄然上线了「跳一跳」小游戏,当时的我初学移动开发,还不知道这些对我们来说意味着什么;如今看来,微信小程序在某种程度上替代了移动端,市面上大部分的场景下,都不再需要app的介入。
类似ReactNative的方案更像是为了消费者领域涉设计的跨端框架,目前市面上绝大多数ToC的App产品均应用此方案来实现,通过原生渲染来保证使用体验的同时,又拥有了高动态性,可以随时下发UI级别的更新,来迭代业务。
而Flutter方案在我工作中见到最多的就是ToB应用,ToB用户和ToC用户使用体验不同,ToB多数会主动保持软件最新版本,少数也会因为服务强制升级而升级;且ToB用户使用时间较长,需要更稳定的服务以及更高的性能来运行;看起来Flutter就像是为了ToB市场而生的。
跨端框架百花齐放的今天,未来的移动端开发会是什么样的,以产品的角度来看,一款好的产品会需要强劲的产品力,产品力的定义不只是产品业务,还有一部分是产品的使用体验,在业务全面铺开后,开发人员成本已经是项目最小支出的情况下,未来为了吃掉剩下的一小部分低性能设备市场一定会逐步地将主流程更替为原生开发,进一步实现混合架构。